Step by step drawing of a tulip for children. Draw a tulip with dew drops
There are several types of tulips, and their shapes are very different from each other. Below is a flower called "parrot" - it has a smaller calyx than a regular tulip and is more difficult to draw. Use the outlines described here before adding details.
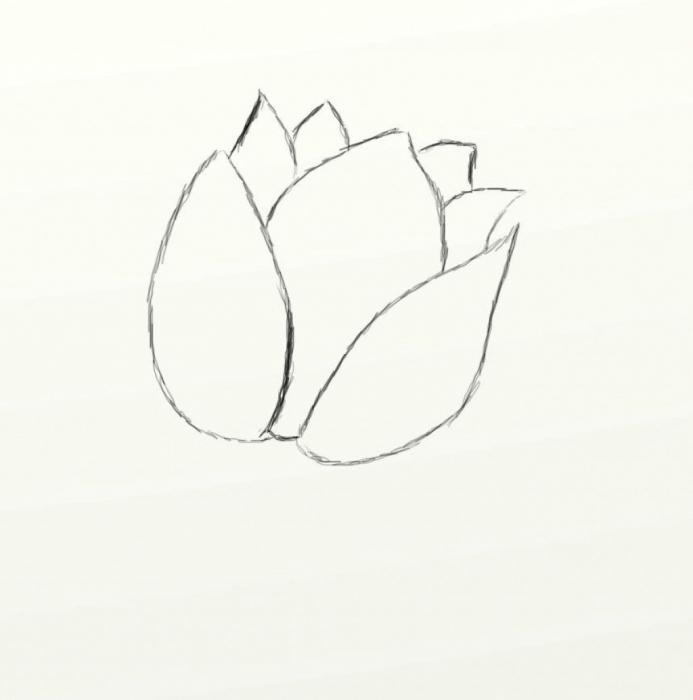
Drawing of a parrot tulip.
Start your drawing with a straight line that connects the most prominent points of the petals - it is important for you to convey the basic shape of the flower. In step 2, add the corners of the petals. Then draw the actual shape of the petals and finish off with some simple shading.
The shadow on the petals is created with just a few strokes and creates the feeling of overlapping petals.
Form creation.
In the tulip shown in the picture, look for the rhythm that the lines obey. Step 1 shows that it all starts with three simple lines that set the main directions. Step 2 shows how to add lines to build the overall shape of the flower. Step 3 refines the shape of the flower and shows its grace. In step 4, you can add details and start shading, which gives the flower volume.


Already drew +2 I want to draw +2 Thank you + 7
Flowers are wonderful plants that are not only attractive in appearance, but also exude a pleasant aroma. It is difficult to count all types of flowers, because they differ in shape, color and smell. Tulips are considered the most tender, because they bloom in the touching time of the year - in spring. It is customary to give them to girls and women to express their sympathy. It’s hard to resist not to depict them, let’s figure out how to draw a bouquet of tulips in a vase and without a vase with pencils.
Tools and materials:
- White list;
- Simple pencil;
- Eraser;
- Black pen;
- Colored pencils (pink, yellow, red, burgundy, light brown, dark brown, lime, green, beige).
We draw a bouquet of tulips in stages
- Step 1
Let's start the drawing with a wrapping package that will hold the shape of the entire bouquet. Its upper part will be the widest. Toward the bottom, the side parts of the paper will fold inward, so we will draw additional lines and connect them at the bottom in the center.
- Step 2
We add a bow from below, which will not only decorate, but also hold the entire bouquet. The bow is made of ribbon, so its ends can be different (one is shorter and the other is longer). Under the bow, add some more wrapping paper, which will expand slightly towards the bottom.

- Step 3
Inside the wrapping paper, we begin to draw tulips. Let's start from the bottom by adding three oval-shaped buds. The leaves of the flowers will be wide, but narrow and pointed towards the edge. The leaves are placed a little casually so that they look more natural.

- Step 4
Now you need to finish drawing more tulips and leaves. Please note that there will be fewer flowers towards the top and they will be concentrated in the middle of the bouquet.

- Step 5
Tulips will be different colors. Let's draw some tulip buds in pink, and some in red. The ribbon on the bouquet will have a pink tint, but add red for volume.

- Step 6
Sketch the remaining buds with a yellow pencil. Burgundy color is needed to draw the contours and shadow on the flower petals.

- Step 7
Let's move on to the leaves. First you need to draw the entire area where the leaves are, light green, and then draw their contours in green.

- Step 8
The outside of the wrapping paper will be beige. Draw the inside of the wrapping paper with two shades of brown. Dark brown is concentrated below, light brown is concentrated above.

- Step 9
With a black pen, draw the outlines of the bouquet and all its details. You can add some shadows with this tool.

- Step 10
Drawing how to draw a bouquet of tulips is ready!

How to draw tulips in a vase
A gift for the holiday in the form of a bouquet of flowers is nice. Unfortunately, flowers are short-lived and may not last long in a vase, but with proper care, they can last not only for several days, but even weeks. There is an assumption that the longer the flowers stand, the more the person (who gave) loves. We will act more cunningly and make sure that our flowers never wither, or rather, we will figure out how to draw a bouquet of tulips in a vase.
Tools and materials:
- White sheet of paper;
- Eraser;
- Black marker;
- Black pen;
- Colored pencils (yellow, orange, red, burgundy, light green, green, blue, blue).

Video: how to draw tulip flowers in a vase
Do you like to draw flowers? With the help of a few lessons given in this article, you will learn how to draw a tulip quickly, easily and naturally. You'll like it!
Lesson #1
Draw a tulip with a pencil
For ease of understanding, we divide the lesson into 7 steps. So, make sure you have a blank sheet of paper in front of you and a sharpened pencil in your hands. A good soft eraser will not be superfluous. How to draw a tulip in ten minutes? Let's draw in five! Your preparation must have taken longer. Let's get started.

In the center of a sheet of paper, draw the first petal in the shape of a tear. It's simple, you can do it.

To the left of the drawn one, draw another petal of a teardrop-shaped bud. Note that they are not in contact with each other, but are located a little at a distance.

Now draw a tulip petal between the two already drawn.
Then draw the rest of the petals that are further away from the foreground. Only their tops will peek out at the top of the bud.

It's time to draw the stem. Draw it slightly bent under the weight of the flower head.

Let's go back to the button. Draw veins in the center of each petal - draw a pair of parallel lines and connect them at the top. The flower immediately became voluminous, right?

Let's finish the drawing with small shading in places of shading.
With how to draw a tulip in stages, it seems that they figured it out. Let's increase the level of skill by depicting a tulip in color.
Lesson #2

Look carefully at the sample. Notice how the stem is curved, what shape the bending leaf has, what the proportions of the bud are.

Draw a thin line following the curve of the stem. At the top, make a rough sketch of the bud. At this stage of learning how to draw a tulip, try to keep the proportions.

With light strokes of the pencil, draw the outlines of the leaves. They, as a rule, are straight in tulips, but in the lower part of the stem they are larger, and therefore gracefully bend. Displaying such nuances makes the drawing more realistic.

The thickness of the stalk must also correspond to the bud. It cannot be too thick, nor too thin.
It is important to place the leaves correctly. In one place they cover the stem, in another they slightly overlap each other.

There is nothing difficult in how to draw a tulip, but in three-dimensional drawing, as in photography, there are rules that must be followed. Draw the petals of the bud, pressing lightly on the pencil until you are satisfied with the result.

With a sure touch of the pencil, outline the contours of the tulip and erase unnecessary lines.
How to draw a tulip in color? At this stage, you will need two pencils: pink and light green.

Circle the sketch of the tulip. Erase the remnants of a simple graphite pencil. So much better, right? At this stage, you already have a colored tulip template in front of you.

Shade the entire flower with pencils. Pink - bud, light green - stem and leaves. There are no shadows in the drawing yet, so it seems to be smoky, just add a little more color in some parts of the petals and leaves.

Take a pink pencil a tone darker than what has already been used, and red. Paint over the petals, paying attention to the color transition from almost white at the stem to deep red at the edges of the bud petals.

Similarly, add shadows to the stem and leaves with a dark green pencil. The two upper leaves hugging the flower trunk have darker inner sides than the outer ones, because they get the least amount of sunlight.

Blend the colors with a piece of cotton wool or just with your own finger.
Now the question "how to draw a tulip with a pencil" is not a question for you! Draw, experiment, and your flowers will be perfect.
In the new video, I decided to complicate the task - to draw another tulip, but in bright light. Harder in colored pencils often means longer because the degree of detail increases, the set of applied techniques expands.
A very nice photo reference caught my eye, which I decided to use for the drawing:
Using this reference, you can practice the following skills:
- obtaining a blurred background with gentle transitions of tones
- transmitting the glow of light through the petals
- rendering the right hues in the shadow of the overlapping petals
For work, I used Canson drawing paper, Faber-Castel children's pencils and a Derwent polishing pencil (you can use a regular white pencil).
Everything, as usual, begins with a sketch. I did not include it in the video, because. there is nothing complicated or unique here. I removed all the extra lines with a nag, leaving a barely noticeable outline:

I decided to carry out this drawing in the direction from dark to light shades. Using gray shades and the color of burnt umber, first I painted over all the shadow areas of the flower (this will give us later realistic shades of color in the shadow):

Then I outlined the veins of the petals in red. Here it is important to observe the direction of the veins in the shape of the petals and work with a sharpened pencil.

And finally, the "magic" itself began - over all the dark shades, I walked with an orange-yellow color that made the tulip petals glow from the inside.

On top of each petal, I went over with a polishing pencil to smooth out any bumps and get a smooth texture of the petals. I first painted over the tulip leg with burnt umber and put a couple of dark green shades on top:


The main thing here is not to press hard on the pencil, otherwise you will not be able to achieve smooth color transitions. It is better to build up the tone gradually in layers. With this, our new illustration is ready.


Do you like spring flowers, from which it breathes freshness, warm sun, tenderness? Then you will probably be interested in learning how to draw a tulip.
Draw a red tulip
Red tulips are what is called a classic. Therefore, it is from them that we will begin to learn how to draw a tulip in stages. Don't worry if you don't have experience in fine arts - everything will be very simple and clear.
First of all, we outline the general shape of the flower, its bowl.

Then we draw two outer petals. Please note that all lines should be very even and smooth.

Then we will depict a closed middle. It will somewhat resemble an egg divided into two halves.

Now let's add a stem and two large leaves - wide, downright fleshy in appearance.

After that, let's color it. The flower will be bright red, the leaves will be juicy green. To add volume, the middle part of the flower can be made a little lighter.
Everything, on this drawing is over.
Raspberry tulip - learning to portray a bud
The delicate bud of a tulip has served as a source of inspiration for many artists. Let's join them and learn how to draw a tulip with a pencil.
First of all, we draw a petal, shaped like a droplet.

Then the second, symmetrically to the first, the same medium-sized droplet.

And the third is in the center.

Let's do the background. There, too, it is necessary to depict the protruding tips of the petals located behind.

Add a stem - it should be quite wide.

Then we note the place of the bend - almost all varieties of tulips have it. There will be a highlight.

Next, let's deal with light and shadow - it is due to this that the flower will have volume.

Let's take care of the color - you need to paint the flower in a rich, bright crimson color. And the stem is green.
Cute pink tulip - learning together
Are you just starting to learn fine art and would like to understand how to draw a tulip for beginners? Then this tutorial is what you need. Everything is described here in a very accessible way, step by step.
At the first stage, we will depict the lower part of the flower. It will look like two bowls placed one inside the other.
Then we will make the upper part of the petals - smooth, rounded, very delicate.
In the next step, we will begin to depict the stalk and leaves.

And also a pot with a cute little heart.

Time to move on to color. Tulips are very delicate flowers, so let's reflect this in the color scheme. Let's make the flower pink.
Everything, now the work with the picture is completely over. The picture can be left in the album or hung on the wall.
Beautiful tulips - draw with the children
Drawing is a very useful, fun and interesting activity for children. This develops creative thinking, imagination, fine motor skills, and just allows you to have a good time. So call the baby and we will learn how to draw a tulip for a child.
First, let's draw a bud with three pointed petals. The bud will be very neat, collected, with straight lines.

After that, add a thick stem and a large wide leaf.

Then - a flower pot with soil. The pot will be the most ordinary, in the form of a cylinder, without any decorative elements.

Now the fun part is coloring. Stock up on bright felt-tip pens, pencils, crayons or paints - and get to work. We made the bud bright pink, but you can make the tulip any speckled purple. The pot can also be made both brown and red, yellow, blue, multi-colored, plaid or striped.
That's all - we did it. Do not forget to praise your small but very talented artist.
Purple tulip - draw an unusual flower
Do you want to try to portray something unusual? What do you think of the purple tulip? Very unusual and very interesting. So let's learn how to draw a tulip flower.
Let's start with the general shape - the halves of an oval.

Then we draw a curved smooth line from one edge of the "bowl" to the center. This is the left petal.

By analogy, we make the right petal. But it will not reach the very bottom, so that the flower does not look too symmetrical.
Then we will make the central petal. Only its sharp tip will be visible.

After that, add a thick straight stem.

And two large symmetrical leaves on the sides of the stem.

Let's do color. As already mentioned, the flower should be unusual, eye-catching, so let's make it soft purple. Everything is easier with the leaves - they will be light green.
That's all, the drawing is completely completed. Everything was quite simple, wasn't it?