Repair the windows 7 boot file. Repair the bootloader using the recovery console in Windows XP
Each Windows operating system of a personal computer has special tools that are responsible for an action or operation. But there is such a tool with which you can change errors and problems, as well as restore windows from the command line.
If the OS does not boot, you need to use the help of the Bootrec.exe utility
With its help, problems are fixed in the computer, data is corrected, including windows downloads or configuration files of downloads.
Bootrec.exe - Help fixing Windows bootups
If you have problems starting your computer and find problems with it, you should use the method to fix Windows boot errors. It doesn’t matter which Windows is installed, the problem must be resolved so that you can continue to perform the tasks assigned to you.
When working with a tool like Bootrek.exe, they use commands for , but if the problem situation arose in the OS itself, the tool should be launched inside it.
If this happened in Windows 7 version, you will need installation media or a disk that is capable of restoring the boot sector of the hard drive. You can boot from USB or DVD discs, it depends on the OS version.
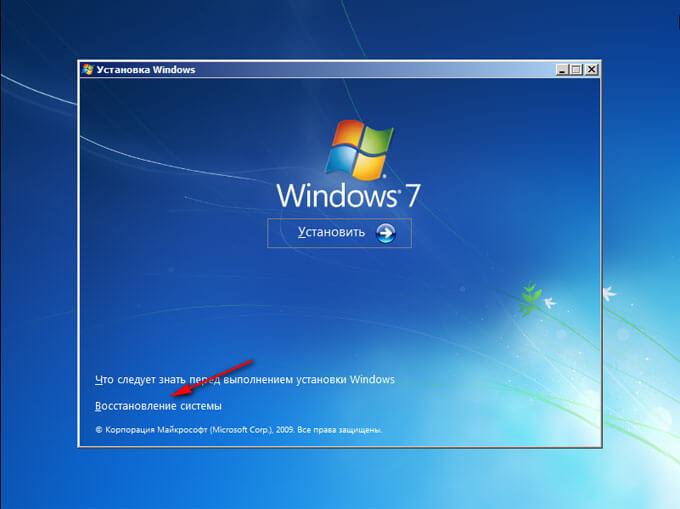
fig.1. When you see such a picture on the monitor, click on the highlighted functionThen you need to decide on the choice of the operating system that needs to be updated. This is a serious undertaking, as among many systems, only one requires fixing. Click the "Next" button to continue.
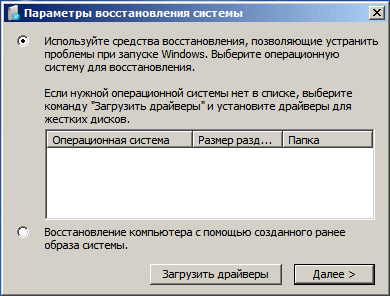
fig.2. A new window will open with recovery properties, but only the boot command line is needed hereFollow a certain sequence: need access to Recovery systems, Diagnostics, Advanced options and Command lineIf there is no disk for installing on Windows 7 or a disk responsible for restoring the boot sector, you will need access to the tools. They are using recovery hidden partitions. Windows 7 will be able to set them automatically when the OS is installed.
Writing new boot sectors
The bootrec function with the /FixBoot option will make it possible to write to the boot sector inside the system partition on hard drives. When performing this procedure, you need to use boot partitions, but only those that are compatible with Windows 7 and 8 versions.
These options can be used:
- If there are damages on the boot sectors, and their structure and size do not meet the requirements of the hard disk.
- When writing incompatible boot sectors with the Windows system.
- When the old Windows OS was installed in place of the new version.
Mar 3 2015
How to restore the Windows 7 system on a laptop, a black screen comes up on boot, the recovery environment does not work, I deleted all the hidden partitions, there is no original disk with Windows 7.
I spent a lot of time, tell me what to do now, or at least how to insure myself against such situations in the future, preferably without using paid data backup programs.
How to restore the Windows 7 system
Unfortunately, there are enough reasons for this trouble, ranging from incorrectly written drivers, the harmful effects of a virus, file system errors and ending with our erroneous actions when working with a computer, you don’t need to be afraid of such problems, you need to learn how to deal with them effectively.
Let's think about how to restore the windows 7 system, as well as insure ourselves for the future from possible troubles using the backup and recovery tools built into the operating system.
We will learn how to restore Windows 7 without using third-party backup programs, even when System Recovery Options does not load and the F-8 button is useless.
It has in its arsenal a fairly powerful and good tool -> Recovery Environment, which is created automatically when you install Windows 7 in a hidden partition and contains five other tools that solve numerous malfunctions and problems.
Note: If you learn how to use Windows 7 recovery tools correctly, and this is not difficult, then you can do without additional and paid data backup programs.
You can start the recovery tool by pressing the F-8 button on the keyboard immediately after starting the computer. After that, a menu of Additional boot options will open in front of you: Troubleshoot your computer, then Safe mode, Safe mode with loading network drivers, etc.
Small digression: Before choosing the Troubleshoot your computer item, try the simpler option - Last Known Good Configuration - in simple words, the operating system always remembers the last successful boot of the computer and enters this information into the registry.
In case of problems with booting, Windows can remember the registry settings and driver settings that were used the last time the system was successfully booted and use them if you select the Last Known Good Configuration option.

If this tool does not help, select the first -> Troubleshoot your computer,

Next, we get to the Windows 7 System Recovery Options menu, which is what we need, it is here that we can select the System Restore Tool we need, there are five in total, let's take a closer look at how they all work.
The first thing to do is apply Startup Repair (Automatically fix problems that prevent Windows from starting).

Required digression: After pressing the F-8 button when the computer boots up, you may not have an item > Troubleshoot your computer, but only Safe Mode and so on, the question arises why.
When installing Windows 7, a recovery environment partition is created automatically and is located at the root of the drive (C:) in the Recovery folder. You can also see in the Disk Management window - a separate, hidden partition of the hard drive, its volume is only 100 MB, it is used to store boot configuration files (BCD) and the system boot loader (bootmgr file).
You can see it Computer-> Management-> Disk Management. In no case can you delete this partition (many people delete it out of ignorance), otherwise you will not start the recovery environment, that is, you will not have the Troubleshoot computer item, and in more severe cases you simply will not boot the system.

On the bottom screenshot, you can see another hidden partition, with a capacity of 9.02 GB, this is a hidden recovery partition with the factory settings of my laptop, you can have it more or less. It is also better not to delete it, if necessary, you can always restore Windows 7 from it.

What to do if you do not have a partition with the recovery environment and when you press the F-8 button, in the Advanced boot options menu, the Troubleshoot your computer item does not appear? How then to restore the Windows 7 system?
The installation disk with the Windows 7 operating system can save here. You can start the recovery tool by booting from the original Windows 7 installation disk by selecting System Restore at the very beginning.
If you don't have an installation disk, then you can use the Windows 7 Recovery Disk (you can make one in any running Windows 7) in five minutes, then you can also boot from it and do the same.


So, we still got into the System Recovery Options, either using the F-8 button and the Troubleshooting item, or the Windows 7 installation disc or the Windows 7 Recovery Disc.
In the System Restore Options menu, select the first one:
Launch Recovery-> there will be an analysis of faults that interfere with the normal loading of Windows 7 and their further correction for the normal loading and functioning of the operating system.
In the process, we may be warned that problems have been found in the boot options, click Fix and restart.


System Restore-> using this function, we can select a previously created system restore point, if we have it enabled, and roll back to the time when our Windows 7 worked fine and loaded, everything is simple here.


Restoring a system image-> I personally use this tool, with skillful use it can replace paid data backup programs, if you are interested, read on.

Why is he good? It will help when you don't have the original Windows 7 installation disc and you have deleted the hidden partition with the factory settings of your laptop, but that's not all.
Sometimes there are situations when, for various reasons or due to the actions of a virus, you will not be able to load the operating system at all, or many people ask How to restore the Windows 7 system, even if the menu with Additional boot options is also unavailable. Reinstall the operating system again?
Therefore, immediately after installing Windows 7 on your laptop or computer, we use this function to create a system image restore, an archive image of our Windows 7 on your hard drive, and save it.
Be sure to create a Windows 7 Recovery Disc (read below), it will help you use the System Image if the Advanced Boot Options menu does not load.
Go to Start -> Control Panel -> Backup Computer Data.

Select "Create a system image".

In my case, the Local Disk (E :), if you have several hard drives in the system unit, then of course it is better to place the backup on the hard drive where the operating system is not installed.

By default, the data backup program will automatically select the partition with the Windows 7 operating system, if you wish, you can add Local drives for archiving yourself, as long as you have enough space.

Note: You can see that I have two operating systems installed on my laptop, so the backup program chose two Local drives.

Click Archive and the process of creating an archive with our Windows 7 will begin.
Created, it will look like this.

Now, you can deploy the archive with Windows 7 to your computer, if necessary, in 20-30 minutes. It would be better if you copy the archive with the system additionally to a portable hard drive, this will double your safety.
Let's pretend that we can't start Windows 7 and deploy the backup we created, let's do it together.
We launch the Windows 7 Recovery Tool by pressing the F-8 button on the keyboard immediately after starting the computer.
The Advanced Boot Options menu opens, select Troubleshoot your computer.

Restoring a system image


Use the latest available system image.


Of course, all our data on the Local Disk, where the operating system is now being restored, will be deleted, so you can pre-boot from any Live CD and copy what you need.
How else can you restore your Windows 7 system? Of course with the help of the Windows 7 Recovery Disk.
Let's create, which can be used to boot the computer, it will contain recovery tools with which you can repair Windows 7 boot problems, as well as restore the operating system from the backup copy that we created in advance.
Important: The bitness of the system is important for the recovery disk, you can use a 32-bit recovery disk for any 32-bit Windows 7, and a 64-bit recovery disk for any 64-bit Windows 7.
Again we go Archiving computer data.

Create a system recovery disc, insert the DVD into the drive, click "Create Disc".


When the Windows 7 Recovery Disk is ready, put it in a safe place.
In order to restore Windows 7 from the Recovery Disk, in principle, no operating system is needed at all.
You will only need to change the boot priority to the drive in the BIOS of your computer, insert the recovery disk into it and restore your Windows 7 using the archive.
Many here can draw an analogy with data backup programs, and rightly so, they work on the same principle, but their functionality is of course more convenient.
Restoring Windows 7 from the Recovery Disk. I show you how to do it. Suppose we are in trouble, we cannot start Windows 7, when we press F-8 on the keyboard, nothing happens immediately after starting the computer.
We cannot get into the menu with Additional boot options and an error message is displayed. In this case, the system archive on the hard disk is not available to us. It was precisely such a nuisance that happened to our reader Ilya, who wrote us a letter asking for help.
In this situation, many reinstall Windows 7 from scratch, but not us, because we have a System Recovery Disc.
We insert it into the drive and reboot, set the BIOS to boot from the drive, as I said the disk is bootable, the System Recovery Options program starts.
Press Enter until the offer to boot from disk is gone.


Automatically, the recovery tool running from the disc will try to repair the startup of Windows 7.


If all else fails, select any tool, try for example Recovering a computer using a previously created image of the operating system.


We use the latest available system image.


What other ways are there to restore Windows 7?
There is another little-known way to restore Windows 7 boot after a crash, and I'll tell you about it. At first glance, it will seem difficult to many, but nevertheless it often helps me out.
The fact is, friends, that a very large part of the problems due to which you cannot boot Windows 7 lies in registry errors. And Windows 7 wouldn't be Windows 7 if it didn't have a mechanism to protect registry files. Such a mechanism exists and creates archive copies of the registry in the RegBack folder every 10 days, regardless of whether you have system restore enabled or not.
If you can't fix problems booting Windows 7, you should try to replace the existing (and apparently corrupted) registry files from the Config folder with archive files from the RegBack folder. To do this, we will have to boot the computer from the Windows 7 installation disc or the Windows 7 recovery disc.
We boot into the recovery environment, select the command line.

We type in it - notepad, we get into Notepad, then File and Open.

We go into the real explorer, click My computer. Now we need the system drive C:, attention, the drive letters here can be confused, but I think you can recognize the system drive C: by the Windows and Program Files system folders inside.

We go to the C:\Windows\System32\Config folder, the current registry files are located here, we specify the File type - All files and we see our registry files, we also see the RegBack folder, in it every 10 days the Task Scheduler makes a backup copy of the registry keys.

So, we will replace the existing registry files from the Config folder with backup registry files from the RegBack folder.
So, first of all, let's delete the SAM, SECURITY, SOFTWARE, DEFAULT, SYSTEM files from the C:\Windows\System32\Config folder, which are responsible for all registry hives (my advice is to copy the registry hives somewhere just in case before deleting them).

In their place, copy and paste files with the same names, but from a backup copy, that is, from the RegBack folder.


Note: You cannot delete the SAM, SECURITY, SOFTWARE, DEFAULT, SYSTEM files all together, delete them one by one. Then copy the same files from the RegBack folder in their place.
Friends, if this does not help, apply Windows 7 File Integrity Recovery, if the operating system does not boot, it is done in the same way as in Windows 8.
What else do we have left of the Windows 7 recovery tools?
Memory Diagnostics 7-> checks system memory for errors. Command line-> with it you can delete files that interfere with loading Windows 7.
I hope our article on how to restore a Windows 7 system helped you.
For many years, Microsoft has improved the recovery system of the Windows operating system, and in Windows 7 and Windows Vista it works almost automatically. If you boot from the Windows 7 installation disc and click " System Restore" ("Repair Computer"), the Windows recovery system will start and try to fix any errors it finds on its own. It is able to fix a large number of problems, however, it is quite possible that the bootloader is corrupted, and the recovery system cannot cope with this problem. In this case you can restore the bootloader manually using the Bootrec.exe utility.
The Bootrec.exe application is used to fix errors related to bootloader corruption and, as a result, the inability to start the Windows 7 and Windows Vista operating systems.
Sequencing
Description of bootrec.exe startup keys
Bootrec.exe /FixMbrLaunched with the /FixMbr switch, the utility writes a Windows 7 and Windows Vista compatible Master Boot Record (MBR) to the system partition. Use this option to troubleshoot problems with master boot record corruption or if you wish to remove non-standard code from it. The existing partition table is not overwritten in this case.
Bootrec.exe /FixBoot
Launched with the /FixBoot key, the utility writes a new boot sector compatible with Windows 7 and Windows Vista to the system partition. You need to use this option in the following cases:
- The boot sector of Windows Vista or Windows 7 has been replaced with a non-standard one.
- The boot sector is corrupted.
- A previous version of the Windows operating system was installed after installing Windows Vista or Windows 7. For example, if Windows XP was installed, NTLDR (Windows NT Loader, Windows NT boot loader) will be used, the code for the regular NT 6 boot loader (Bootmgr) will be overwritten by the Windows XP installer .
It should be noted that a similar effect can be achieved using the bootsect.exe utility, also found on the Windows 7 boot media. To do this, you need to run bootsect.exe with the following parameters:
Bootsect /NT60 SYS
The boot sector of the system partition will be overwritten with BOOTMGR compatible code. You can learn more about using the bootsect.exe utility by running it with the parameter /help.
Bootrec.exe /ScanOs
Launched with the /ScanOs switch, the utility scans all drives for installed Windows Vista and Windows 7 operating systems. In addition, when used, it displays a list of found systems that are not currently registered in the Windows Boot Configuration Data (BCD) storage. ) Store).
Bootrec.exe /RebuildBcd
Launched with this key, the utility scans all drives for installed Windows Vista or Windows 7 operating systems. The found operating systems are displayed in a list from which they can be added to the Windows Boot Configuration Data Store. Also use this option if you want to completely rebuild the boot configuration data store. Before doing this, you must delete the previous storage. The set of commands in this case can be as follows:
bcdedit /export C:\BCDcfg.bak attrib -s -h -r c:\boot\bcd del c:\boot\bcd bootrec /RebuildBcd
In the example above, the current boot configuration store is exported to the file C:\BCDcfg.bak, the system, hidden, and read-only attributes are removed from it, after which it is deleted with the DEL command and rebuilt with the bootrec /RebuildBcd command.

Enlarge picture
Of course utility bootrec.exe very functional, however, it will not help if, for example, the Windows bootloader file bootmgr damaged or physically missing. In this case, you can use another utility, also included in the Windows 7 distribution media - bcdboot.exe.
Restoring the boot environment with BCDboot.exe
BCDboot.exe is a tool that is used to create or restore a boot environment located on the active system partition. The utility can also be used to transfer download files.
The command line in this case might look like this:
bcdboot.exe e:\windows
Replace e:\windows with the correct path for your system.
This operation will repair the corrupted Windows Boot Environment, including the Boot Configuration Data (BCD) store files, including the bootmgr file mentioned above.
Syntax of bcdboot command-line options
The bcdboot.exe utility uses the following command line options:
BCDBOOT source]
source
Specifies the location of the Windows directory to use as the source when copying boot environment files.
Optional parameter. Specifies the language of the boot environment. The default is English (United States).
Optional parameter. Specifies the drive letter of the system partition where the boot environment files will be installed. The default is the system partition specified by the BIOS firmware.
Optional parameter. Enables the mode of detailed logging of the utility operation.
Optional parameter. Combines the settings of the newly created and existing storage boot record and writes them to the new boot record. If an operating system bootloader GUID is specified, combines the bootloader object with the system template to create a boot entry.
Summary
The article discussed the principles of working with the bootrec.exe and bcdboot.exe utilities, which are used to resolve problems associated with the inability to start the Windows 7 operating system due to a damaged or missing bootloader.
Restoring the Windows 7 bootloader - performing actions to restore the operating system to working capacity after problems occur when loading Windows. Due to a system failure, the user may lose data, personal files located on the computer.
At one point in time, the operating system will not be able to boot on the computer. Various messages appear on the screen (not always in Russian), which indicate a problem with loading Windows.
The main causes of problems with the Windows 7 bootloader:
- user actions: an attempt to use hidden system partitions, incorrect changes to boot files using EasyBCD, etc.;
- system failure;
- exposure to malicious software;
- the appearance of bad blocks on the hard drive of the computer;
- operating systems installed on the computer in the wrong order;
- hardware problems.
The problem with the bootloader must be resolved, otherwise you will not be able to use Windows, because the system does not start on the computer. Problems can be fixed in a radical way: again on the PC.
If there is, created by the system tool, or using third-party programs, you need to restore from a Windows backup image created in advance. Many users, unfortunately, do not pay due attention to system backup, so these methods will not work for them.
How to restore the Windows 7 bootloader? To restore the operating system boot files, use the built-in Windows tools: automatic startup repair, as well as using the BootRec and BCDboot utilities that are part of the operating system and run on the command line.
Before using the operating system tools, you need to know the layout of the hard disk. Modern computers have a GPT hard disk layout style and a new BIOS - UEFI, and in the days of Windows 7, disks used MBR layout, and now an outdated BIOS. On some computers, Windows 7 64-bit is installed on UEFI and GPT disks, and in general, Windows 7 PCs use MBR (Master Boot Record) partitioning.
In this article, we will look at instructions on how to restore the bootloader using system tools in Windows 7: first, we will perform automatic repair, and then we will try to restore the bootloader from the command line.
To perform bootloader recovery operations, you will need either an installation DVD with the operating system, or a bootable Windows 7 flash drive. Bootable media is needed to be able to boot the Windows RE (Windows Recovery Environment) recovery environment on a personal computer, with which you can try to solve problem with the inability to start the system.
Performing Windows 7 Recovery Automatically by System Tool
The easiest way: automatic recovery of the boot partition on the hard drive using the operating system. This action takes place without user intervention, it is only necessary to boot on the computer from the boot disk.
Immediately after starting the computer, using the keyboard keys, you need to enter the boot menu (Boot Menu) to select an external device to boot: DVD drive or USB flash drive. Which keys to press depends on the equipment manufacturer, check this in advance.
Another way: you can enter the BIOS and set the boot priority from the connected device there: a USB drive or a DVD drive.
In this example, I am using a Windows 7 installation disk, all actions from a bootable USB flash drive are performed in a similar way.
In the first window of the Windows Setup program, click on the "Next" button.
In the window prompting you to start installing the operating system on your computer, in the lower left corner, click on "System Restore".
In the System Recovery Options window that opens, a search for installed systems will start.
After a while, a message appears stating that problems have been found in the computer's boot options.

Click on "Details" to see a description of the fix.

To start the automatic troubleshooting of system boot problems, click on the "Fix and restart" button.
After the bootloader is restored, the Windows 7 operating system will boot on the computer again.
Automatic troubleshooting by system tools can be started a little differently:
- In the "System Recovery Options" window, activate the option "Use recovery tools to fix problems starting Windows. Select the operating system to restore", and then click on the "Next" button.
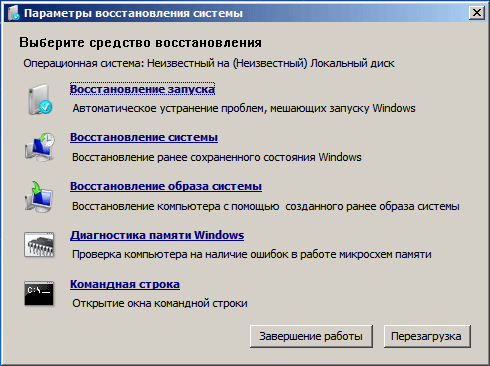
- In the window for choosing recovery tools, click on "Startup Repair".
- Wait until the end of the operation to automatically fix problems that prevent the system from starting.
If the problem is not automatically resolved, continue with the following methods, in which the user will have to manually enter commands at the Windows command prompt.
Restoring the Windows 7 bootloader using the Bootrec utility
The next method involves restoring the Windows 7 bootloader via the command line. To do this, we use the Bootrec.exe utility. This method only works with disks that have an MBR master boot record.
From the boot disk, you need to enter the Windows Recovery Environment as described above.
In the System Recovery Options window, click on the Command Prompt option.
The Bootrec.exe utility uses the following basic commands:
- FixMbr - option writes the Master Boot Record (MBR) to the Windows 7 compatible system disk partition, the existing partition table is not overwritten
- FixBoot - using the command, a new boot sector is written to the system partition, which is compatible with Windows 7
- ScanOS - searches all drives of installed systems that are compatible with Windows 7, displays entries that are not in the system configuration store
- RebuildBcd - search all disks of installed Windows 7 compatible systems, select systems to add data to the boot configuration store
The FixMbr command is used to fix the master boot record, as well as to remove incorrect code from the master boot record.
The FixBoot command is used under the following conditions: the boot sector is corrupted, the boot sector has been replaced with a non-standard boot sector, an earlier version of Windows (Windows XP or Windows Vista) was installed on a Windows 7 computer.
The ScanOS command searches all disks for operating systems compatible with Windows 7. As a result, all entries related to other operating systems installed on the computer that are not displayed in the boot manager menu will be displayed.
The RebuildBcd command allows you to discover and add to the repository the boot configurations installed on the system machine. The parameter is used to completely rebuild the system boot storage configuration.
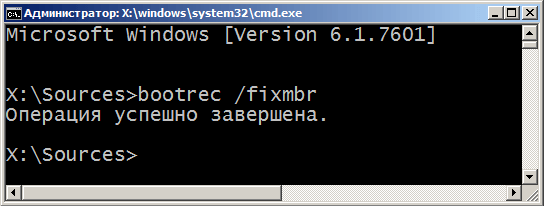
In the command line interpreter window, enter the command (after entering commands on the command line, press the "Enter" key):
Bootrec /fixmbr
If the problem persists, you may need to enter the following command:
Bootrec /fixboot
The rest of the commands apply if the computer has more than one operating system.
Close the command prompt, and in the "System Recovery Options" window, click on the "Restart" button.
How to repair the Windows 7 bootloader command line using the BCDboot utility
Using the bcdboot.exe utility, you can restore the Windows 7 bootloader on computers with MBR or GPT hard disk layout styles.
Boot from a removable device, go all the way to the window with the choice of the method of restoring the system, and then launch the command line. Another option: in the very first window, press the "Shift" + "F10" keys on your keyboard to enter the command line window.
In the command prompt window, enter the command to run the DiskPart utility:
diskpart
To display information about the disks on your computer, type the following command:
List volume
We need to find out the drive letter (volume name) on which the operating system is installed.
The volume name (drive letter) in Diskpart may be different from the drive letter in Explorer. For example, in my case, in Explorer, the system partition has the letter "C", and in diskpart it is marked with the letter "E".

To exit the diskpart utility, type:
bcdbootX:\windows
In this command: "X" is the drive letter on which the operating system is installed. In my case, this is the letter "E", you may have a different name for the volume (disk).

Close Command Prompt.
In the System Recovery Options window, click the button to restart your computer.
Article Conclusions
If you experience problems with the Windows 7 boot loader, you must restore the system boot files by booting your computer from the Windows boot disk. You can restore damaged or missing files using the operating system tools: automatic Windows boot troubleshooting using the Bootrec and BCDboot utilities launched from the command line in the recovery environment.
Experienced PC and Internet user
The Windows bootloader can be damaged as a result of system failures, viruses, and some other careless actions. However, you can try to restore it to return the operating system to a healthy state.
How to restore the Windows 7 bootloader from a disk or flash drive
In what cases is it worth resorting to this method? An installation disc or other portable media can fix “Bootmgr is missing” \ “Non system disk or disk error” errors, virus blocking access with a request to transfer money, and other failures that occur before the desktop appears. First of all, we need a ready-made distribution of Windows 7 on any available media. Further:
- connect the flash drive to the PC or insert the disk into the cd-rom tray;
- boot from them (by setting in the BIOS, or by hotkeys Esc, F8, F9);
- after selecting the language, we get to the menu with the “Install” button;
- at the bottom and on the left, click on the item “System Restore”;
- if we are offered to connect network capabilities, we skip this step, we will not need them;
- optionally configure the language and reassign drive letters or leave them unchanged;
- we indicate the operating system whose bootloader needs to be restored - click on our Windows 7;
- when the list of operations appears, click on the item “Automatic startup repair”;
- some time will pass, the system will either start up or give an error;
- If the method doesn't work, move on to the next one.
How to restore Windows 7 bootloader via command line
We perform all the same actions as in the previous paragraph of the article - we boot from the media, we reach the menu with options for actions. Here we select the command line, in it:
- We type the command bootrec / fixmbr - it is designed to overwrite the MBR bootloader in windows 7.
- If this is not enough (for example, the computer is infected with special mbr viruses), add bootrec /fixboot to it - it creates a new boot sector.
- When both commands are notified that the actions were completed successfully, we restart the computer and boot in normal mode, from the hard drive.

How to Repair the Windows 7 Boot Loader - Option Using the Console
Also on the boot disk or flash drive is the bootsect.exe utility, which is able to help fix the bootloader if bootrec does not work. For this:
- in the command line we type bootsect / NT60 SYS - the boot sector is overwritten;
- if the bootloader file is damaged or physically missing, we use the bcdboot.exe program, which is also included in the distribution;
- to restore, use the bcdboot.exe e:\windows command, where e:\windows is the path to your OS on the hard drive;
- to learn more about using these commands, run them with the --help option.


The manipulations described above, if performed correctly, should be enough to fix any problems with a damaged bootloader. If the error occurs after the Windows 7 desktop appears, the problem is something else.